Hyperstack - Tutorials

How to Generate Videos with Wan 2.1 on Hyperstack: A Comprehensive Tutorial

Written by Sebastian Panman de Wit | Feb 28, 2025 11:28:54 AM


What is Wan 2.1?

Wan 2.1 is Alibaba’s latest open-source AI model for text-to-video generation, offering advanced capabilities in creating high-quality, realistic videos from textual descriptions. It builds on previous versions with enhanced multimodal support, allowing users to generate and edit videos using text and image references. The model ranks highly on VBench, a benchmark for video generative models, demonstrating its ability to handle complex interactions and dynamic scenes. 

What are the Features of Wan 2.1?

The key features of Wan 2.1 include:

  • Multilingual Support: You can generate videos in English and Chinese with accurate text effects.

  • Diverse Input Modalities: Wan 2.1 accepts text and images for flexible content creation.

  • High-Quality Output: Wan 2.1 produces cinematic-grade videos with detailed textures and smooth transitions.

  • Advanced Editing: Wan 2.1 allows fine-tuning with image and video references for better control.

  • Open-Source Access: Wan 2.1 is available on GitHub and Hugging Face for developers.

  • Benchmark Performance: Wan 2.1 ranks high on VBench for video realism and multi-object interactions.

How to Generate Videos with Wan 2.1 on Hyperstack

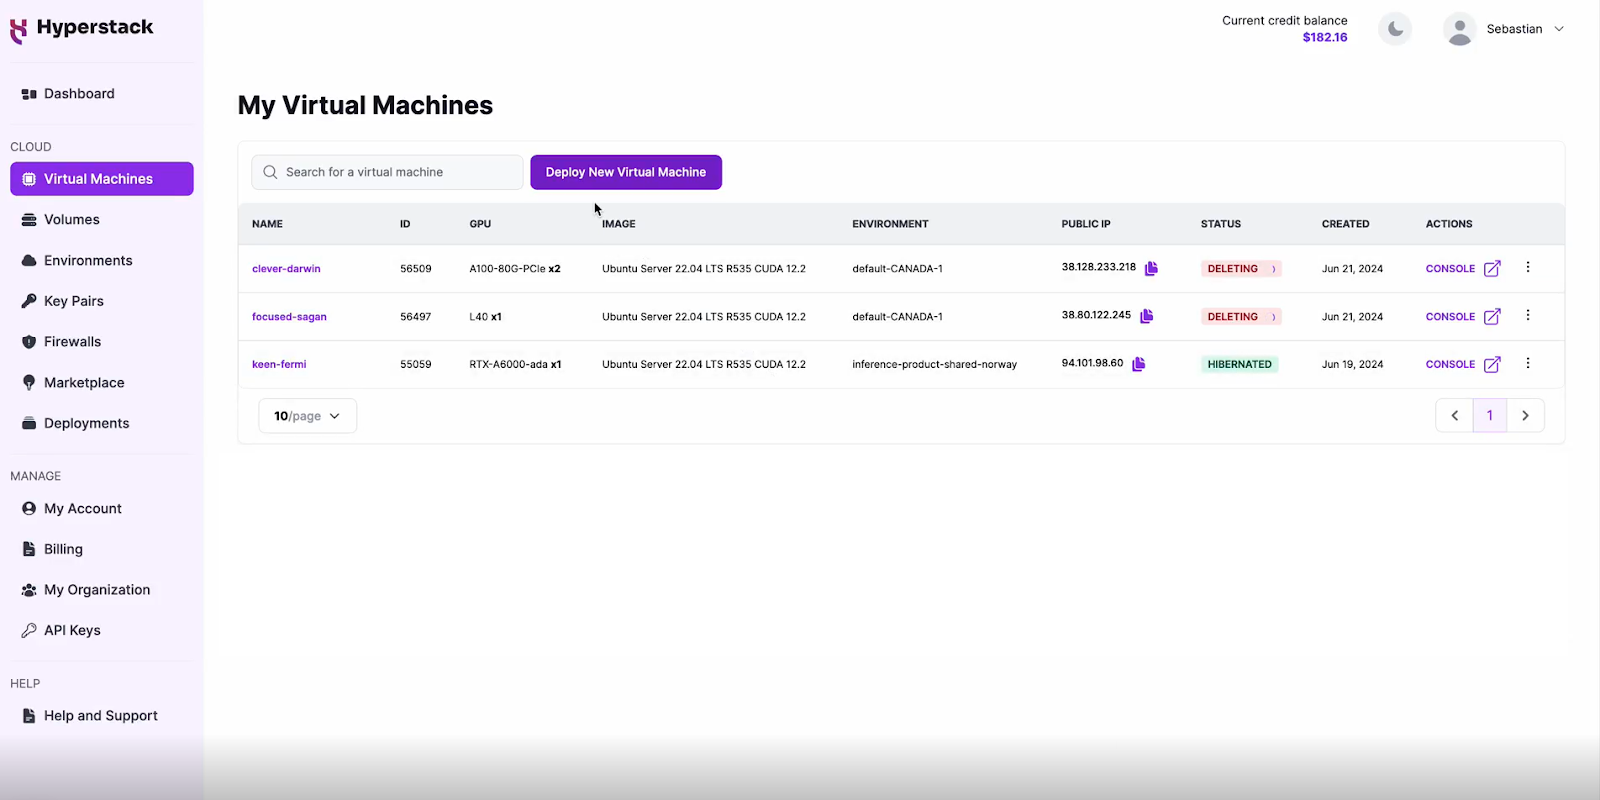
Let's walk through the step-by-step process to generate videos with Wan 2.1 on Hyperstack:

Step 1: Accessing Hyperstack

  1. Visit the Hyperstack website and log in to your account.
  2. If you don't already have an account, you'll need to create one and set up your billing information. Check our documentation to get started with Hyperstack.
  3. Once logged in, you'll enter the Hyperstack dashboard, which provides an overview of your resources and deployments.

Step 2: Deploying a New Virtual Machine

Initiate Deployment

  1. Navigate to the "Virtual Machines" section and click "Deploy New Virtual Machine."
  2. Click it to start the deployment process.

Select Hardware Configuration

  1. For a small model (1.3B), we recommend choosing the NVIDIA L40x1 GPU. For larger model (14B), you can choose the NVIDIA A100x1 GPU

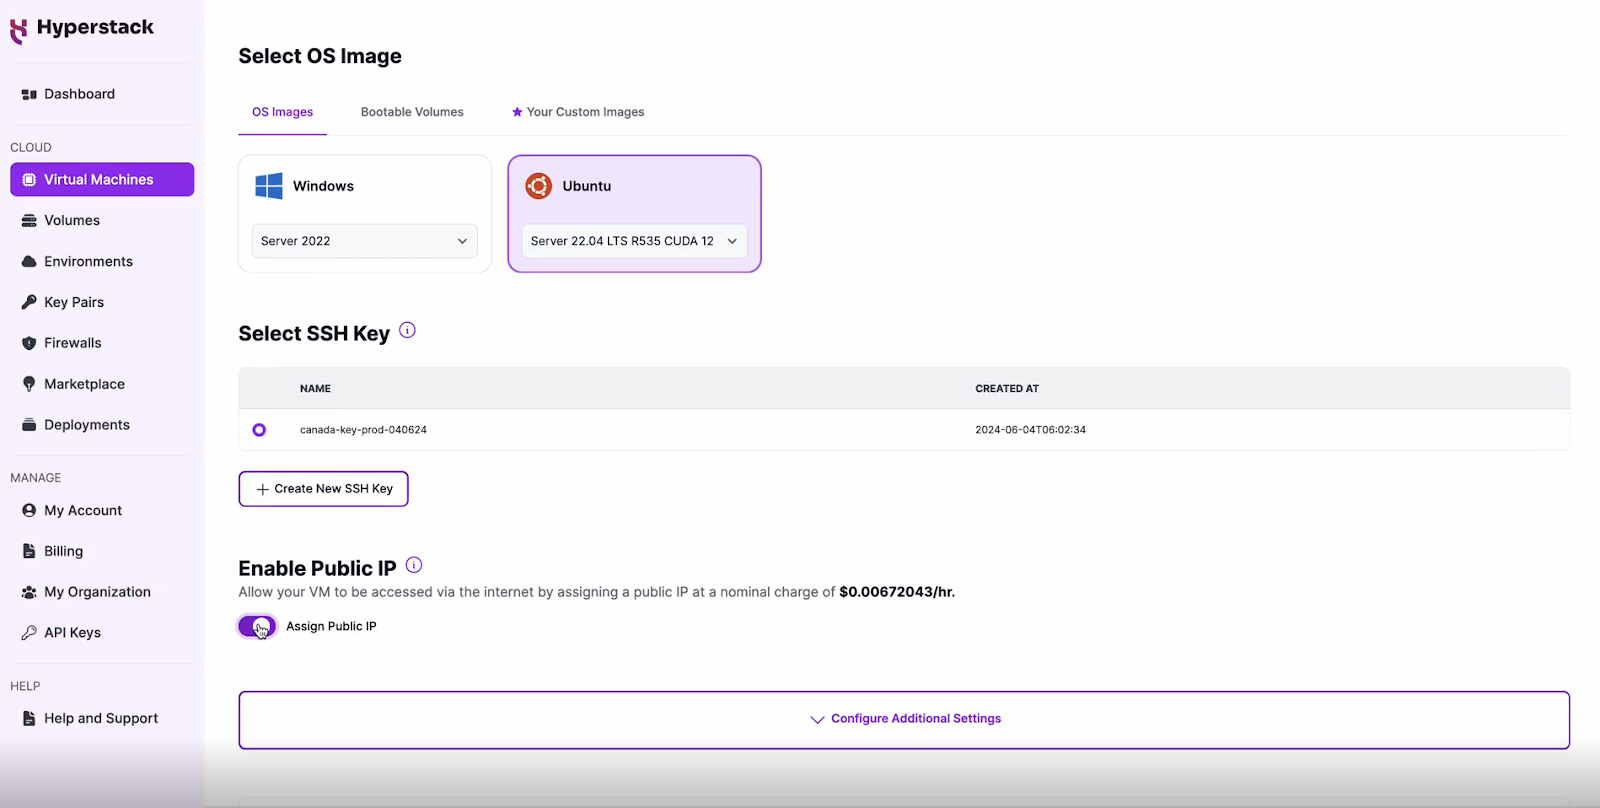
Choose the Operating System

  1. Select the "Ubuntu Server 22.04 LTS R550 CUDA 12.4 with Docker".

Select a Keypair

  1. Select one of the keypairs in your account. If you don't have a keypair yet, see our Getting Started tutorial for creating one.

Network Configuration

  1. Ensure you assign a Public IP to your Virtual machine.
  2. This allows you to access your VM from the internet, which is crucial for remote management and API access.

Enable SSH Access

  1. Make sure to enable an SSH connection.
  2. You'll need this to connect and manage your VM securely.

Add Firewall Rules

  1. Open port "7860" to allow incoming traffic on this port. 

Please note: This will open your port to the public internet, allowing anyone with the public IP address and port number to access the dashboard. 

Review and Deploy the Script

  1. Double-check all your settings.
  2. Paste the cloud-init script (click here to get the cloud-init script for 1.3B) into the initialisation section when deploying your VM. 
    i. By default, it loads the 1.3B model, which generates 480p videos quickly (under 5 minutes).
    ii. For 720p resolution, use the cloud-init-txt-to-video-14B.sh here, which runs the larger 14B model (~10x bigger). This will take longer to generate videos.
  3. Click the "Deploy" button to launch your virtual machine.

Refer to the blog's video generation durations section below for more details.

Step 3: Setting Up the Model

  1. Set up time of cloud-init script: +-5 minutes to install libraries, download models and set up the UI.

Step 4: Accessing Your VM

Once the initialisation is complete, you can access your VM:

  1. In the Hyperstack dashboard, find your VM's details.
  2. Look for the public IP address, which you will need to connect to your VM with SSH.

Connect via SSH

  1. Open a terminal on your local machine.
  2. Use the command ssh -i [path_to_ssh_key] [os_username]@[vm_ip_address] (e.g: ssh -i /users/username/downloads/keypair_hyperstack ubuntu@0.0.0.0.0)
  3. Replace username and ip_address with the details provided by Hyperstack.

Generating Videos with Wan 2.1


Once the above steps are completed, follow the below steps to generate a video with Wan 2.1:

Step 1: Open Gradio UI

Once the deployment is complete, access the Stable Diffusion Web UI by navigating to[public-ip]:7860 in your web browser to generate videos with Wan 2.1. For example, open: http://000.00.00.221:7860/

Please note: This link will be accessible to anyone with the link. To restrict access, you can disable the Public IP and use SSH port forwarding instead.

  1. Disable public-ip.
  2. Use SSH port forwarding together with your keypair, with this command:
    ssh -i [path_to_ssh_key] -L 7860:localhost:7860 [os_username]@[vm_ip_address] # e.g: ssh -i /users/username/downloads/keypair_hyperstack -L 7860:localhost:7860 ubuntu@0.0.0.0
  3. After running the above command, go to localhost:7860 in your browser to access the demo.

Step 2: Insert Your Prompt

Example prompt:

"A white cat walking through a neon-lit pink and blue GPU data centre, exploring curiously with a playful expression. The cat moves gracefully, sniffing and pawing at the colorful cables and equipment. Medium shot, dynamic camera following the cat's movement."

Step 3: Set the Target Language

Choose English (EN) for the prompt enhancement.

Step 4: Select the Model

The Qwen/Qwen2.5-7B-Instruct model will be used to improve your prompt.

Step 5: Choose the resolution

  • Select 480×832 from the Resolution dropdown.
  • For higher resolution (720×1280), refer to the previous instructions.

Step 6: Generate the Video

Click on ‘Generate Video’ to start the process. Check out the video generation durations below:

Video Generation Durations (based on default Gradio settings with prompt extender):

  • Small 1.3B model at 480p → ~5 minutes on an L40x1.
  • Large 14B model at 480p → ~17 minutes on an A100x1 PCIe.
  • Large 14B model at 720p60+ minutes on an A100x1 PCIe.

Please note: All these durations are with the default gradio settings and include using the prompt extender. That's why these durations can differ from the reported durations from Wan2.1 here

And voila, your generated video is ready! See our generated video below.

Troubleshooting Tips 

If you are having any issues, please follow the following instructions:

  1. SSH into your machine.
  2. Run this command to see logs: cat /var/log/cloud-init-output.log
  3. Debug any issues you see there.

Hibernating Your VM

When you're finished with your current workload, you can hibernate your VM to avoid incurring unnecessary costs:

  1. In the Hyperstack dashboard, locate your Virtual machine.
  2. Look for a "Hibernate" option.
  3. Click to hibernate the VM, which will stop billing for compute resources while preserving your setup.

To continue your work without repeating the setup process:

  1. Return to the Hyperstack dashboard and find your hibernated VM.
  2. Select the "Resume" or "Start" option.
  3. Wait a few moments for the VM to become active.
  4. Reconnect via SSH using the same credentials as before.

Explore Similar Tutorials Below

FAQs

What is Wan 2.1?

Wan 2.1 is Alibaba’s open-source AI model for text-to-video generation, capable of creating realistic, high-quality videos from text, images, and video references.

What GPU is recommended for running Wan 2.1?

  • For the 1.3B model (480p video, faster generation), use NVIDIA L40x1.
  • For the 14B model (higher resolution, more detail), use NVIDIA A100x1 PCIe.

How long does it take to generate a video with Wan 2.1?

  • 1.3B model at 480p: ~5 minutes on an L40x1
  • 14B model at 480p: ~17 minutes on an A100x1 PCIe
  • 14B model at 720p: 60+ minutes on an A100x1 PCIe

Can I fine-tune the generated videos?

Yes, Wan 2.1 allows fine-tuning with image references for greater control over output quality.

How do I reduce costs while using Wan 2.1 on Hyperstack?

You can hibernate your VM when not in use to stop compute billing while keeping your setup intact.

Where can I access Wan 2.1?

Wan 2.1 is available on GitHub and Hugging Face for developers to explore and integrate into their workflows